Have you ever wondered how to make kefir? Of have you heard of kefir? Technically, it is a fermented milk drink with a slightly sour taste, made using a culture of yeasts and bacteria, but most people think of it more simply as drinkable yogurt. You can buy kefir at most grocery stores, but recently I decided to take the plunge and start making kefir myself. Kefir is simple to make, and while I personally don’t enjoy kefir plain, I like to add it to my smoothies and get all the nutritional and probiotic benefits.

All you need to make kefir at home is some kefir grains, milk (organic, pasteurized or raw- not ultra pasteurized), kefir grains, clean cotton cloth for covering + rubber band, fine strainer and 2 clear glass storage containers, one with lid.
You can order kefir grains online (amazon, yeemos, or fusion teas) or you can ask around and see if you know someone in your community who currently makes kefir and can spare some grains. I got mine from my FIL when he was visiting– he loves kefir so much that he brings it with him even on his travels. If you are local, I’m happy to share some kefir grains with you, overtime they reproduce.
Once you make the kefir you can drink it plain, in smoothies, pour it over fresh fruit or in a breakfast parfait, use it in salad dressings or in baking in place of milk, buttermilk or yogurt.
Table of Contents
How To Make Kefir

How to Make Kefir at Home
Kefir is a fermented milk drink with nutritional and probiotic benefits with a slightly sour taste, made using a culture of yeasts and bacteria, but most people think of it more simply as drinkable yogurt. Kefir is simple to make a great addition to smoothies.
All you need to make kefir at home is some kefir grains, milk (organic, pasteurized or raw- not ultra pasteurized), kefir grains, clean napkin for covering + rubber band, strainer and storage container with lid.
Ingredients
- 1 teaspoon kefir grains
- 1 cup whole milk pasteurized or raw, not ultra-pasteurized
Instructions
-
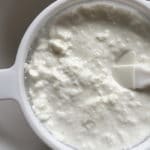
In glass jar add 1 teaspoon kefir grains and 1 cup milk. Cover with cotton napkin and rubber band. Store at room temperature away from direct sunlight for 12-48 hours, or until you start to see separation.

-
After the kefir has fermented, use a bowl or jar, and fine strainer to separate to the grains from the kefir. Use a spatula, if needed, to stir and press the kefir into the strainer.
-
Once all you have left in the strainer are the kefir grains, cover and refrigerate the strained kefir. Start a new batch of kefir using left over kefir grains. Kefir grains reproduce; measure your grains and continue to use the ratio of 1 teaspoon kefir per 1 cup of milk.


Recipe Video
Recipe Notes
Kefir can be stored in a sealed container in the refrigerator for up to a week.
To take break from fermenting kefir, store kefir grains in a fresh batch of milk for up to a month.
My favorite way to use Kefir is in smoothies. Here are some of my favorite kefir smoothie flavor combinations:
kefir + frozen banana + nut butter + cocoa powder + vanilla
kefir + whole orange + frozen banana + vanilla + pinch of salt
kefir + frozen raspberries + frozen banana + collagen peptides
You might also love this lime avocado yogurt breakfast parfait (feel free to sub kefir for yogurt!) and this whole 30 taco salad recipe.
If you learn how to make kefir from this post please share a pic of your DIY kefir on instagram using hashtag #rainbowdelicious & and tag me at @rainbowdelicious , I’d love to see what you are up to in your kitchen!
Some links on this site are affiliate links and I may earn a small commission at no cost to you. Thank you!


Now I wish I could access kefir grains here in Switzerland! Thanks for sharing this recipe and your tips.
I hope you can find some! Thanks Shinta.
Hope this helps… here’s where I order my kefir starter.
https://bacillusbulgaricus.com
Thanks for sharing, Trish!
I’ve always wondered how you made kefir, thanks for such a clear and concise post! Definitely going to give it a go 🙂
Glad to help, Chris! LMK how it goes!
Cuisine is not American.
Thanks for letting me know, John.
Looks like I need to start making my Amazon list for this kefir — though I have glass storage containers already. Do you normally have this for breakfast or snacks?
Definitely, add it. I like it for breakfast smoothies!
This will be great in my protein shakes! Sounds so easy to make too!
It is delicious in protein shakes! Thanks Sara!
Kefir is such a wonderful gift isn’t it? I’ve had my grains going for a while and use the kefir in cheese bases all the time. Soooo good.
Oh, I’ve never tried using kefir in cheese bases, that sounds amazing! Thanks Jana!
I loved your kefir. I’ve always wanted her to make it and this tutorial makes it look so simple.
Thanks Jemma, I’m glad my post could help, let me know how it goes!
I love kefir in smoothies, too! Thanks for showing me how to make it!
You bet Mary!
I’ve totally heard of kefir, but never knew how easy it was to make. I’ll definitely have to try making this for myself.
Yes, it is so simple! My kids did not notice the switch in their smoothies from yogurt to kefir.
I’ve always wondered about kefir but have been pretty nervous to try. Do you worry about bacteria at all?
Hi Flippy, I used to be nervous about making fermented foods at home too, but now I feel very comfortable. If you are feeling nervous, you can order Ph strips to make sure the kefir’s ph has reached below 4.5 before straining. If kefir ever turns pink it is a sign of contamination, so throw it out and start again with fresh grains. (I’ve never had issues with either of these but have read up on it). And of course, only make what you feel comfortable with and fully educated about! Most whole foods have some contaminations risk that it is good to be aware of.
This is great! Something I need to try for sure!
It is so simple, definitely worth a try!
It’s simple! Guess I have to invest for some kefir grains then. Hope I could find some.
Yes, it really is simple! If you can find a neighbor who currently makes kefir that I sometimes the most convenient way to get ahold of some. Enjoy, Maria.
very well explained! I made mine last week and it came out perfect and delicious! thank you!
I’m so glad to hear this. Thanks for sharing, Gustavo! Enjoy your homemade kefir!
I’ve only just heard of kefir so this is a great post to explain the process and show that it can be made at home. Sounds delicious and healthy for smoothies!
Thanks, Amanda.
I never knew this was so simple. I will definitely be giving it a try.
Glad to hear it, Dannii. Enjoy your homemade kefir!
Thank you for this guide, I had no idea how you could make kefir at home so now I have learned something new. Curious to see if I can get my hands on some kefir grains here now.
Thanks Eva, enjoy your homemade kefir!
Hey Emily, thanks for sharing this doable recipe!! I’m so excited to try this out. Hope it turns out well : )
Hope you love your homemade Kefir, Divya!
Hi Emily, great post and you’ve kept it super simple!
I have been making milk kefir for a month or two now, I feel I have the knack of it now! As I was using so much milk when keeping it on the kitchen counter, I ferment it in the fridge for 6-7 days before straining and starting again. The flavour from the fridge is much milder and creamer too.
Noticed quite a difference when fermenting using sealed & un-sealed method as well! I think allowing oxygen makes it more yeasty, whereas sealed version is milder.
Also tried second fermenting for a day or two after the first ferment, although with fruit it went far too sour and alcoholic, and with vanilla/cinnamon it didn’t make much of a difference – so now I just add flavour before drinking.
I would say it’s almost undrinkable on it’s own, pretty much like off milk and pretty awful! I found the most convenient way to make it, almost like the shop bought stuff, is once fermented and strained and decanted into a new jug, and when I come to drink it, I add two tablespoon of shop bought natural yogurt & some fruit puree from a pouch (Ella’s kitchen is good!).
I find that the fermented product last about 6 days in the fridge, and I drink around 200ml a day.
Other thing, the grains grow quite quick, I couldn’t find anybody who wanted my surplus grains so had to dispose of them! If you do not thin the grains out, it ferments very quickly and you go through a tonne of milk plus starts becoming a chore – so keep any eye on that.
That’s everything I’ve learnt through trail and error!
Thank you for sharing your experience and tips!
So when you strain the kefir you wind up with the leftover grains. How can you store the grains until you wish to make more?
I believe you can add a little milk and cover and store in the fridge if you decide not to discard or share the extra grains.
I have been making yogurt for years, but have been wanting to make my own kefir, too. Thank you for the great info!